FGVminiATURES TM
eBayTurning Natural Edge "Penguin" Vases
This article will cover the methods peculiar to the turning of a miniature vase with a natural edge from top to bottom on one side, forming both a natural edge "collar" and side - referred to as a "Penguin" vase. No attempt is made to teach basic woodturning, tool usage, or sharpening, as it is assumed you already have those skills.
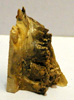 This type of vase is usually made from a section of burl - Maple burl in this case - with the spikes and eyes of the burl running down one side.
 Since miniatures don't incur as much stress as full size turnings, you can attach them with CA glue to a waste block and chuck the two pieces using a scroll chuck (a screw chuck will also work). Note that one side of this piece was trimmed prior to mounting.
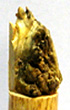
 First you need to round the block down. Because of its asymmetrical shape, you will be "cutting a lot of air". This requires the use of very sharp tools and careful concentration. If you watch very closely you will see that the voided areas form a "ghost" image as the piece turns. To cut these edges cleanly, use a gouge - a scraper will just break the edges.
As you can see, there are a lot of voids on this piece - from the "ears" at the top to the valleys at the bottom. These are what make each of these pieces unique.
 Leave the top of the "ghost" as large as possible, and cut inward from there to create a "neck" on the vase. Don't make the neck too small; you will be hollowing it to some degree. Shape the remainder of the blank to create a pleasing shape in proportion to the top. At this point you can sand and finish the exterior profile.
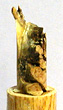
 Drill a hole in the neck using the tailstock to steady the drill and a mark on the drill to control the depth. If the piece is left with a simple drilled hole, it will technically be a bud vase. If it is hollowed out below the neck it becomes a vase. The vase shown is hollow.
If you do hollow the vase, use extreme care and don't let the hollowing tool touch the "natural" portion of the collar or the piece will be ruined. 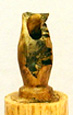
 For a miniature, you will probably have to make your own hollowing tool - a small awl or pick flattened at the end to make a scraper then bent at about a 30° angle for the last ˝ inch will do nicely.
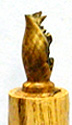
After hollowing, sand and finish the inside. Then part the vase off the waste block and finish the bottom. You can tell from the picture that this vase is hollowed beginning just below the neck.
To purchase a wood turning kit for making these natural edge bowls, or to see a selection of wood turning kits, visit our FGVminiATURESTM store on eBay.